Adding Cost Protection to My Bedrock Agent
Protect public API Gateway endpoints from abuse using usage plans and budget alerts. This post covers practical strategies to limit requests, monitor costs, and explores when AWS WAF or authentication might be needed.

The Problem
I recorded a demo video for my AWS News Search agent and realised my API Gateway endpoint was visible on screen. My first thought was to regenerate the URL so the one in the video no longer worked.
Then I realised it doesn’t matter.
Anyone can open browser dev tools, go to the Network tab, and see the exact endpoint the frontend is calling. Hiding the URL in a video provides no real protection. If someone wants the endpoint, they can get it in seconds.
The actual risk is cost. Every request to the API invokes a Lambda function, which calls a Bedrock agent. Bedrock charges per token. If someone decides to spam the endpoint, my AWS bill goes up.
Protection Options
Rather than trying to hide the endpoint, focus on limiting what can be done with it.
Amazon API Gateway Usage Plans
API Gateway usage plans let you set throttling limits and quotas. You can restrict requests per second and cap the total number of requests per day or month.
For a demo project, a low daily quota works well. Set it to 100-500 requests per day. That’s enough for legitimate use but prevents someone from running thousands of requests overnight.
To create a usage plan:
- Open the API Gateway console
- Select Usage Plans from the navigation pane
- Select Create usage plan
Configure the usage plan details:
- Name:
aws-news-agent-plan - Throttling: Enabled
- Rate:
1(requests per second) - Burst:
5(allows short spikes)
- Rate:
- Quota: Enabled
- Requests:
100 - Period:
Per day
- Requests:
Create the usage plan.
Associate the API Stage
After creating the plan, associate it with your API:
- In the usage plan details, select Add Stage
- Select your API (
aws-news-agent-api) - Select the stage (
prod) - Select Add to usage plan
Create an API Key
An API key is a string that API Gateway generates. Clients include it in requests to identify themselves. The key links requests to your usage plan, which enforces the throttling and quota limits.
- In the API Gateway console, select API Keys from the navigation pane
- Select Create API key
- Enter a name (e.g.
aws-news-agent-key) - Select Save
Copy the API key value. You will need it for the frontend.
The API key is not a security mechanism on its own. Anyone with the key can use it. The protection comes from the usage plan limits attached to it.
Attach the Key to the Usage Plan
- Open your usage plan (
aws-news-agent-plan) - Select the Associated API keys tab
- Select Add API key
- Select the key you created
- Select Add API key
Require the API Key on the Method
- In the API Gateway console, select your API
- Select the
/agentresource and thePOSTmethod - Select the Method request tab
- Select Edit
- Select the API key required checkbox
- Select Save
- Select Deploy API and deploy to the
prodstage
After enabling API key required, requests without a valid key receive a
403 Forbiddenresponse. Test your endpoint to confirm the key is working before updating the frontend.
Test without the API key:
1
2
3
curl -X POST https://your-api-id.execute-api.us-east-1.amazonaws.com/prod/agent \
  -H "Content-Type: application/json" \
  -d '{"message": "test"}'
Expected response:
1
{"message":"Forbidden"}
Test with the API key:
1
2
3
4
curl -X POST https://your-api-id.execute-api.us-east-1.amazonaws.com/prod/agent \
  -H "Content-Type: application/json" \
  -H "x-api-key: your-api-key-here" \
  -d '{"message": "What is Lambda?"}'
Expected response: A valid response from the agent.
Update the Frontend
The frontend now needs to include the API key in the x-api-key header:
1
2
3
4
5
6
7
8
const response = await fetch(API_ENDPOINT, {
    method: 'POST',
    headers: {
        'Content-Type': 'application/json',
        'x-api-key': 'your-api-key-here'
    },
    body: JSON.stringify({ message: message, sessionId: sessionId })
});
The key is visible in browser dev tools, but combined with the usage plan quota, the damage from abuse is limited to 100 requests per day.
AWS WAF
AWS WAF can block or rate limit requests based on IP address. If a single IP sends too many requests in a short period, WAF blocks that IP while allowing others through.
The difference between WAF and usage plans:
- Usage plans limit total requests across all users. One person could consume the entire quota.
- WAF rate limiting limits requests per IP. One abusive user gets blocked, but others can still access the API.
WAF matters when you have multiple users and want to protect against one bad actor consuming the entire quota. For a demo project where you’re the main user, usage plans are sufficient.
Pricing
WAF pricing in eu-west-2 (London):
| Resource | Cost |
|---|---|
| Web ACL | $5.00/month |
| Rule | $1.00/month per rule |
| Requests | $0.60 per 1 million |
A basic WAF setup with one rate limit rule costs around $6/month. For a low-traffic demo already protected by usage plans, the added cost doesn’t justify the benefit.
For production APIs with multiple users or higher traffic, WAF provides an extra layer of protection worth considering.
AWS Budgets
Even with API Gateway usage plans configured, a budget alert provides a safety net for unexpected costs. I already maintain a general budget that tracks overall AWS spend. For this project, I needed a separate budget that tracks only costs generated by the AWS News agent.
Before creating a project-scoped budget, cost allocation tagging must be configured for all resources in the project.
Tag Your Resources
Apply a project tag to each resource associated with the agent:
- search-aws-news (Lambda function)
- invoke-agent (Lambda function)
- aws-news-agent-api (API Gateway)
- aws-news-agent (Amazon Bedrock Agent)
For each resource:
- Open the resource in the AWS Management Console
- Select the Tags tab
- Add the following tag:
- Key:
Project - Value:
aws-news-agent
- Key:
Activate Cost Allocation Tags
Cost allocation tags must be activated before they can be used in AWS Budgets.
- Open the Billing and Cost Management console
- Select Cost allocation tags from the navigation pane
- Locate the
Projecttag under User-defined cost allocation tags - Select the tag and choose Activate
Tags can take up to 24 hours to appear after resources are tagged, and up to another 24 hours to appear in AWS Budgets after activation. This delay occurs because AWS processes billing data in batches rather than in real time. Plan for up to 48 hours before filtering budgets by the tag.
The Problem with Standard Tagging
After tagging resources and activating the tag, I created an AWS Budget filtered by Project = aws-news-agent.
This captured Lambda and API Gateway costs, but it did not capture Amazon Bedrock model invocation charges. Most of the spend was missing from the budget.
Amazon Bedrock requires additional configuration because on-demand foundation model invocation costs are not automatically associated with project-level tags. Tagging the Bedrock Agent resource does not apply tags to model usage. Model invocation costs must be associated through an application inference profile.
I also considered scoping the budget by service, such as Amazon Bedrock and Amazon API Gateway. That approach was not suitable because those services are used by other projects in the same account. A service-based budget would include unrelated costs.
To isolate costs for this agent, tagging is still required. Standard resources are tagged directly. Bedrock model usage requires an application inference profile, which is covered next.
The Solution: Application Inference Profiles
Amazon Bedrock provides Application Inference Profiles to associate cost allocation tags with model invocation charges for on-demand foundation models. An inference profile references a foundation model and supports tagging. When the agent invokes the model through the profile, the tags are included in billing data.
Implementation requires:
- Create an inference profile with the
Project: aws-news-agenttag using the AWS CLI - Update the agent execution role to allow invocation of the inference profile
- Update the agent to use the inference profile ARN instead of the model ID
- Update the agent alias to apply the configuration
For detailed step-by-step instructions including CLI commands, IAM policies, and verification steps, see Cost Allocation Tags for Amazon Bedrock Agents.
Creating the Budget
Once costs appear in Cost Explorer under your tag (allow 24-48 hours after invoking the agent), create your budget.
- Open the AWS Budgets console
- Select Create budget
- Select Customize (advanced)
- Select Cost budget and select Next
- Enter a budget name (
aws-news-agent-budget) - For Period, select Monthly
- For Budget renewal type, select Recurring budget
- For Start month, select the current month
- For Budgeting method, keep Fixed
- Enter your budgeted amount (
$10) - Under Budget scope, select Filter specific AWS cost dimensions
- Select Add filter
- Select Tag from the Dimension dropdown
- Under Tag, select Project
- Keep Includes
- Select aws-news-agent and apply the filter
- Leave Aggregate costs by as Unblended costs
- Select Next
- Select Add an alert threshold
- Set Threshold to
80(% of budgeted amount) - Set Trigger to Actual
- Under Notification preferences, enter your email address
- Select Next
- Review your configuration and select Create budget
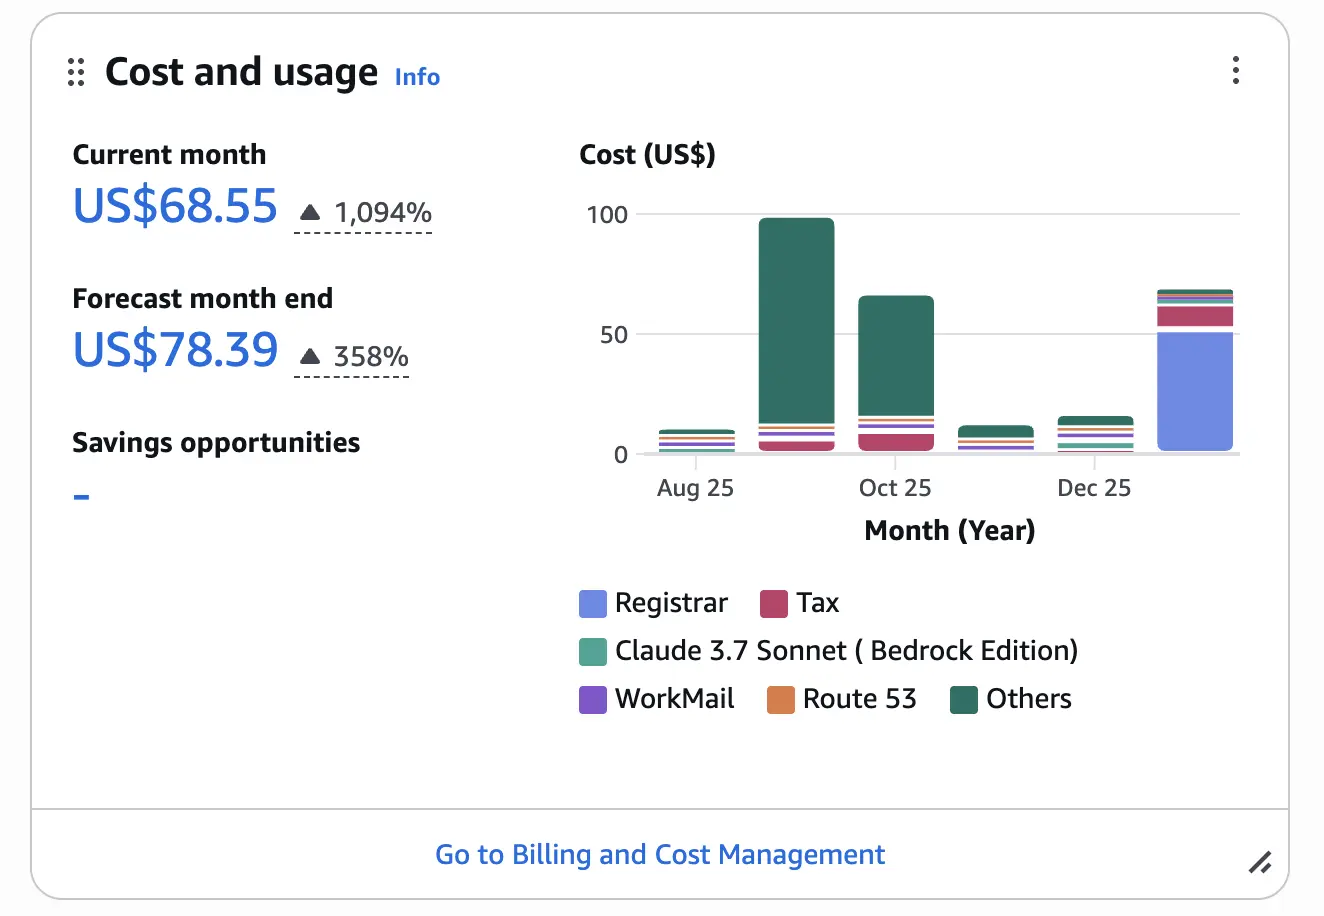
The budget now tracks only costs from resources tagged with Project: aws-news-agent, separate from your other AWS usage.
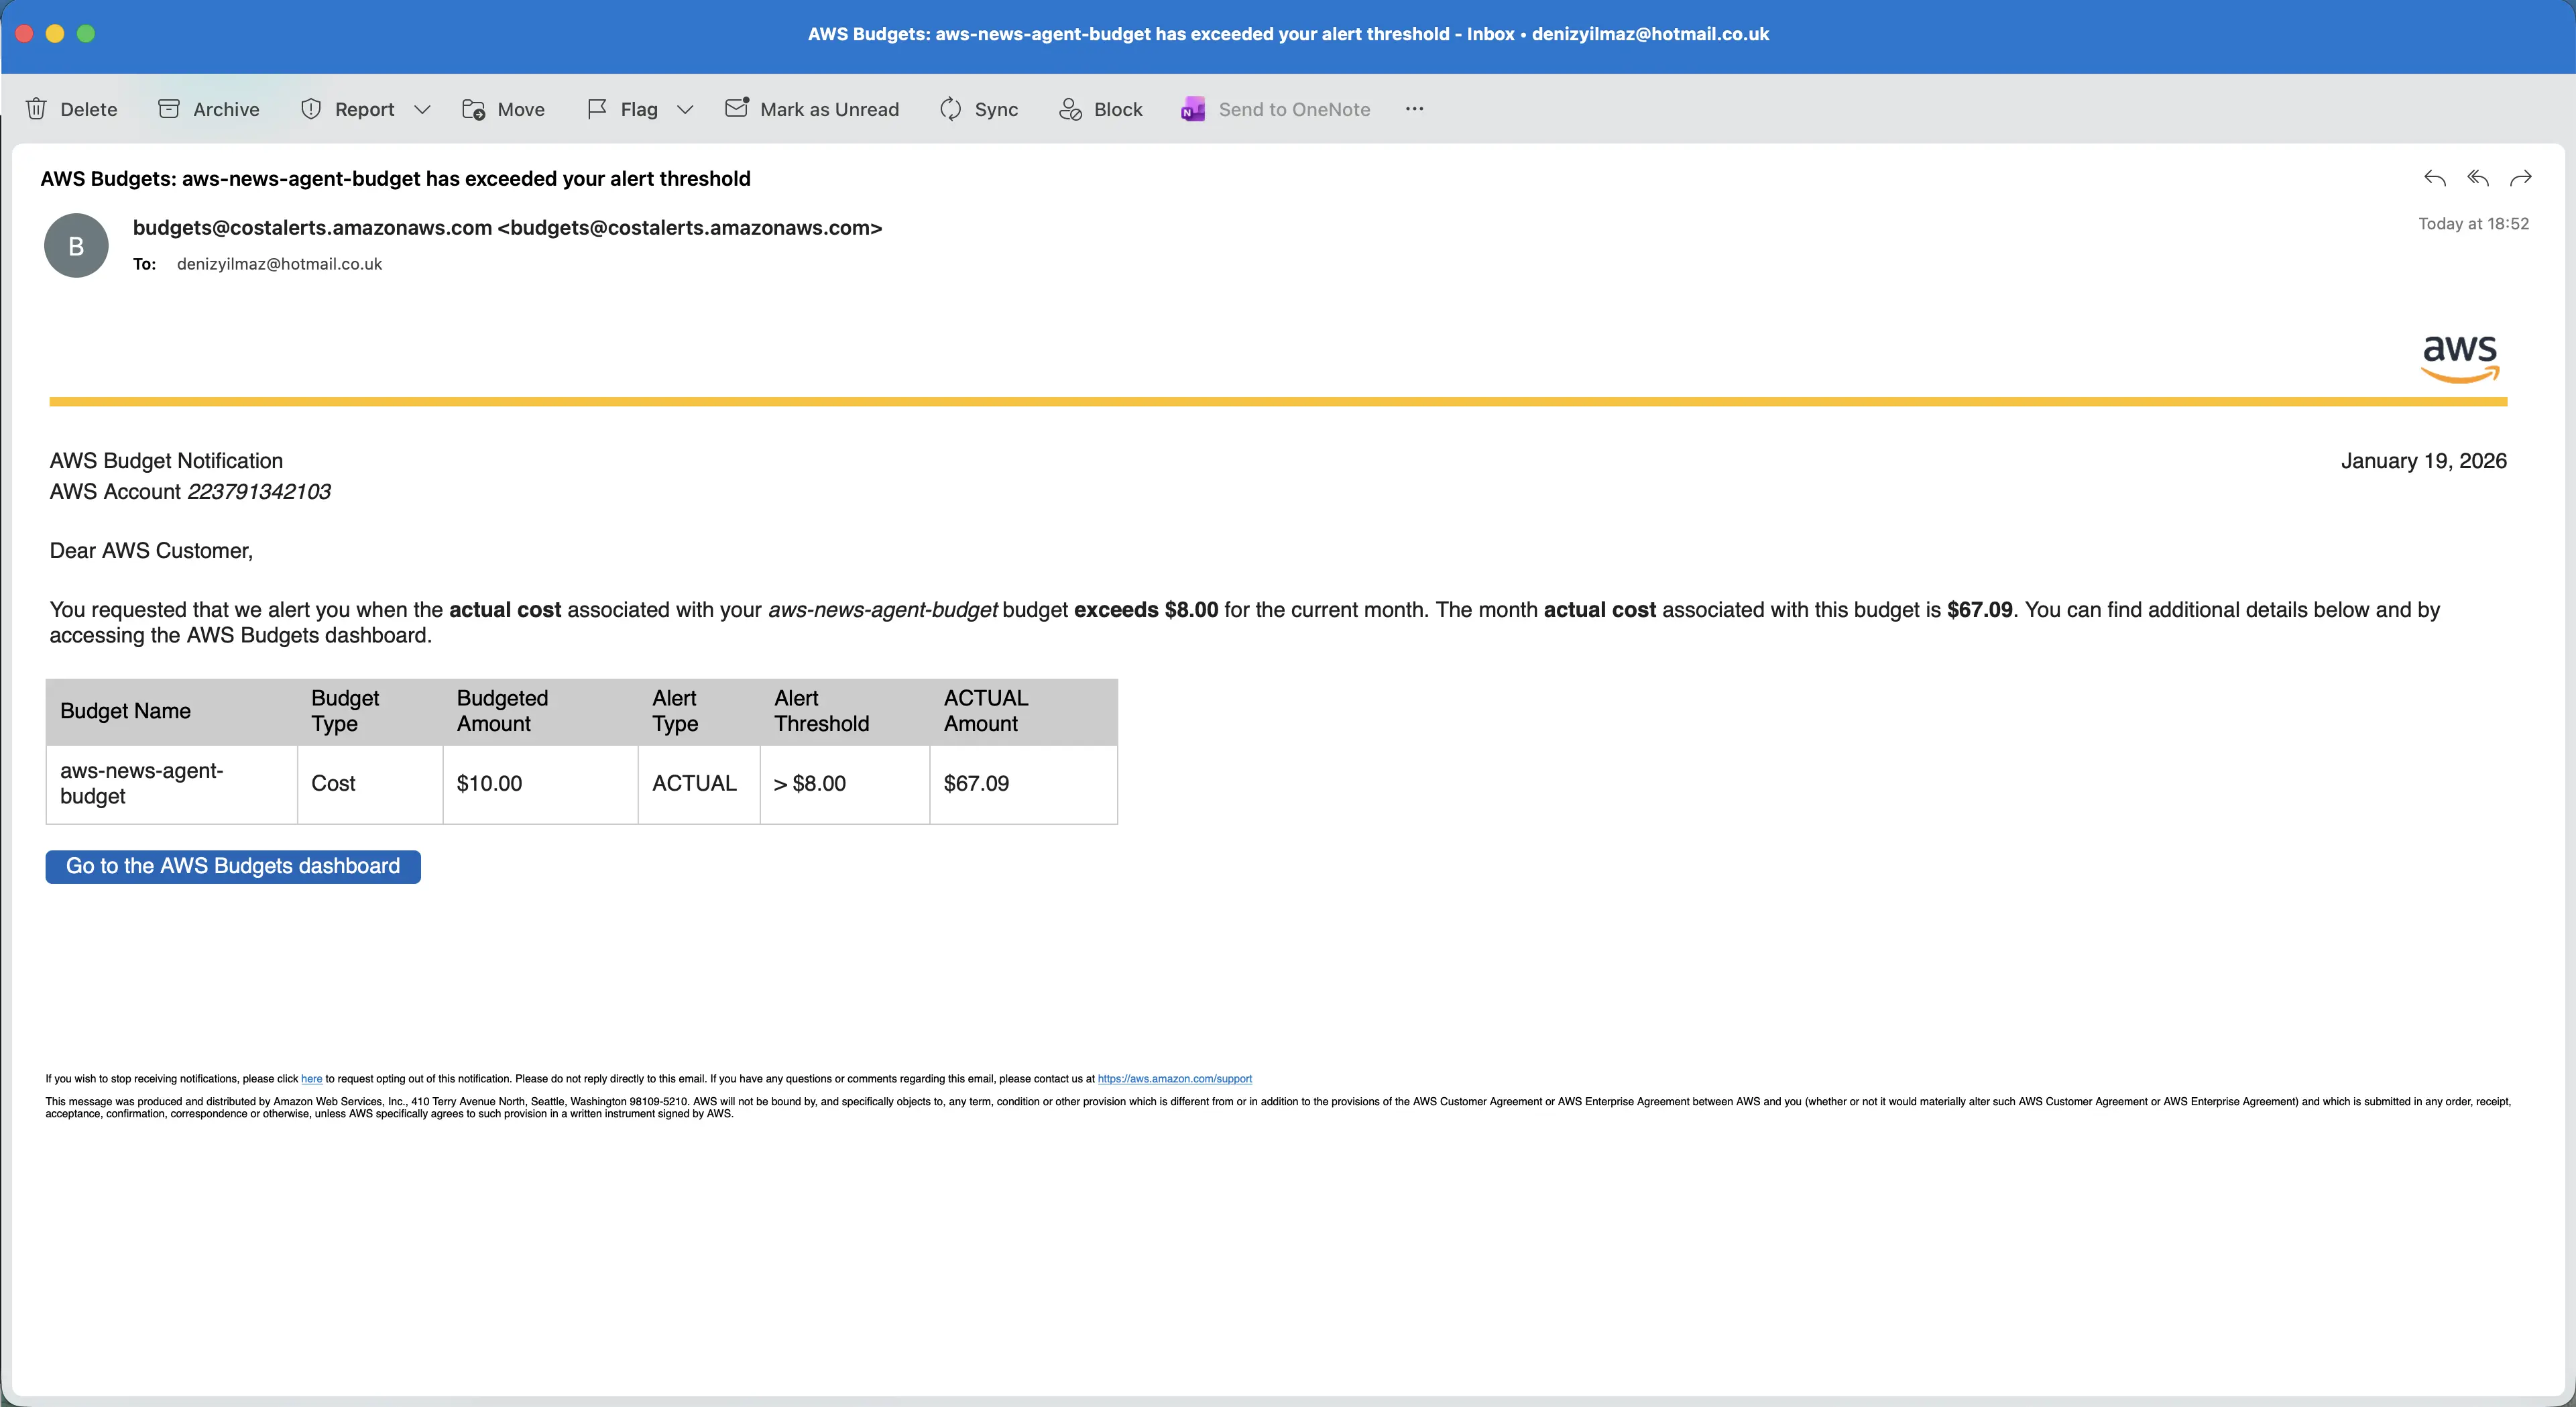 AWS Budget alert for the aws-news-agent project
SNS alternative
Instead of email, you can select an SNS topic ARN for notifications. This is useful if you want to trigger Lambda functions or integrate with other alerting systems.
Summary
Hiding API endpoints in videos or source code does not provide protection. The endpoint remains visible in browser network requests and can be accessed directly.
For this demo agent, a usage plan with a daily quota of 100 requests was configured, along with a budget alert filtered by the project tag. The API remains public, but request volume is limited and unexpected spending triggers a notification.
AWS WAF was evaluated as an option for rate limiting individual IP addresses. For a low-traffic demo already protected by API Gateway usage plans, the additional cost was not justified.
The controls covered in this post, including usage plans, WAF, and budget alerts, limit and monitor request volume but do not restrict who can access the API. For production APIs that handle sensitive data, additional access controls should be implemented:
Amazon Cognito
Users authenticate and receive a token that API Gateway validates before allowing requests.IAM authorization
Requests must be signed with AWS credentials. Only explicitly permitted users or roles can invoke the API.Lambda authorizers
Custom authorization logic validates tokens issued by an external or custom identity provider.Private APIs
API Gateway can be configured as private and accessed only from within a VPC.
For a demo workload, usage plans and budget alerts provide sufficient protection. For production workloads, authentication is required to control who can invoke the API.